

How To Create A New Task In Planner

How to use Power Automate to create tasks in Planner from new tasks created in Project Online
Table of contents
- High-level process to create the flow
- The Tools
- Project Management
- Microsoft Teams
- Microsoft Project Professional
- Microsoft Planner
- Power BI
- Related Links and Videos
High-level process to create the flow
In this video we demonstrate creating a flow with Microsoft Power Automate that is triggered from the Create a Task in Project Online trigger event.
Once triggered, the flow will check to see if a project in Microsoft Planner exists with the same name. If a project does exist, the flow will create any new Task(s) that triggered the event in the Planner project.
In addition to the Create a Task in Project Online trigger, the flow also uses the List groups I own and belong to Action in order to determine the Office 365 Groups the current logged on user belongs to. Once the list of Groups is returned, a Condition is implemented that cycles through the returned Office 365 group names to determine is one is named as the project in which new tasks are being created. If there is an Office 365 Group with the same name as the project in which tasks are being created, we list the plans (Microsoft Planner projects) that are using this Office 365 Group for membership.
After we obtain the list of Planner projects, we implement a Condition to determine if the title of one of the plans (value Title) is the same as the project being published with new tasks. If the title of one of the plans is equal to the project in which tasks are being created, the Create a Task action is executed. The Create a Task Action will use Group Id and the Plan Id to isolate the correct planner project in which new tasks will be created.
The tasks will be created using the identical name of the Project Online tasks. In order to ensure this, the Task name returned from the Create a New Task trigger results returned is specified as the Title in the Create a Task action for Planner. Upon completion corresponding tasks are created in the correct project in Planner that match the tasks in Microsoft Project Online.
Project Management
Since project management requires thorough communications and collaboration, using Power Automate to automate repetitive processes can help ensure success.
Microsoft Teams
Microsoft Teams provides a hub for every day work. Users may deliver professional and engaging experiences with Dynamic view, PowerPoint live and Present mode. Live events is a great way to deliver live webinars to users for training and knowledge-sharing purposes.
Microsoft Project Professional
Microsoft Project Professional helps project managers organize work, as well as manage and track both small and large initiatives. Projects may be planned with the benefit of a powerful scheduling engine, able to calculate accurate completion dates based on task dependencies. The Project Online desktop client is a tool that provides project managers the ability to bring projects in on-time and on-budget. Create a project plan with a task list to track everything from your daily work, to a complex CRM upgrade. Work collaboratively with resource managers to understand the demand on resources and the impact of moving resources between projects.
Microsoft Planner
Planner is a great tool used to organize work with visual task management. Create Kanban boards using task cards with checklists, labels, images and attachments/files. Check status of your plans with visual status charts. Planner is very intuitive and will allow users with no experience to start using the tool immediately. Add a new task, add a task description, add an image to provide the ability to quickly identify a task.
Power BI
Power BI helps organizations engage and visualize data directly. Power BI helps your team easily explore analysts and create reports and dashboards.
Step by Step procedure to create the Power Automate Cloud Flow
- From flow.microsoft.com click Create to build the new flow
- Select Automated cloud flow from the blank options
- In the Build an automated flow dialog box, Specify a Flow name.
– Next, type "Project" in the Choose your flow's trigger search box. From the retrieved triggers, select When a new task is created.
– Click the Create button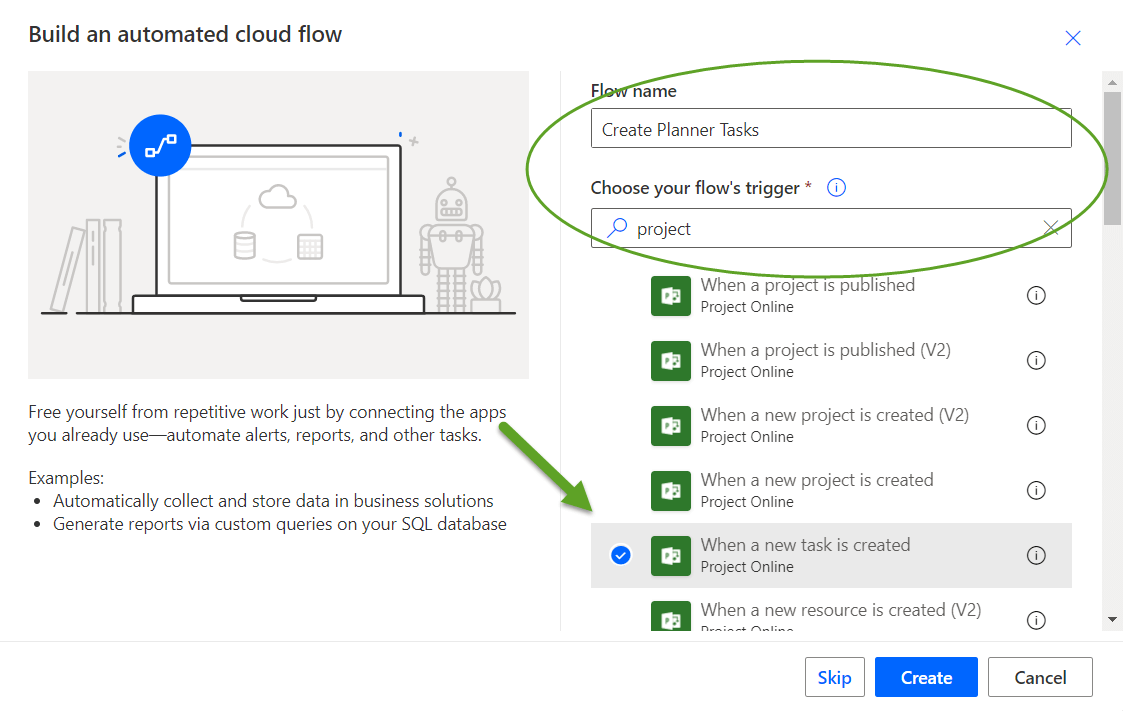
- in the When a new task is created Action, do the following:
– Paste the URL to your Project Web App site in the When a new task is created Root Site URL text box.
– Click New step
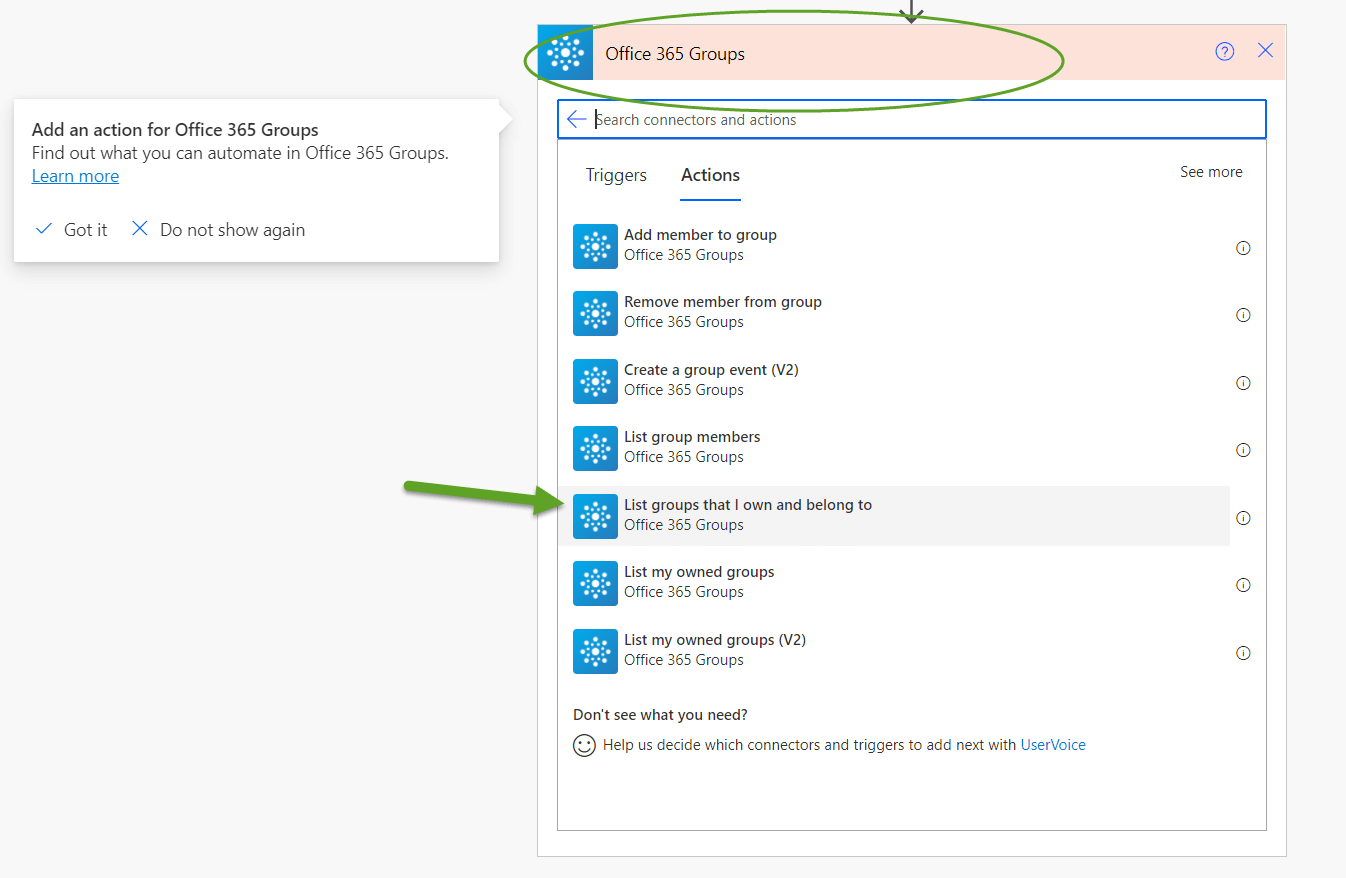
- Type "Group" in the search connectors and actions search box
- Under Actions, locate and select the List groups that I own and belong to from the available actions.
– No config is necessary for this action
- Click the New step button.
- Locate Condition under the available Actions and select it.
- In the Condition action settings, for the Choose a value on the left select Project Name in the When a new task is created group of retrieved values on the Dynamic Content tab.
- Leave the operator as is equal to
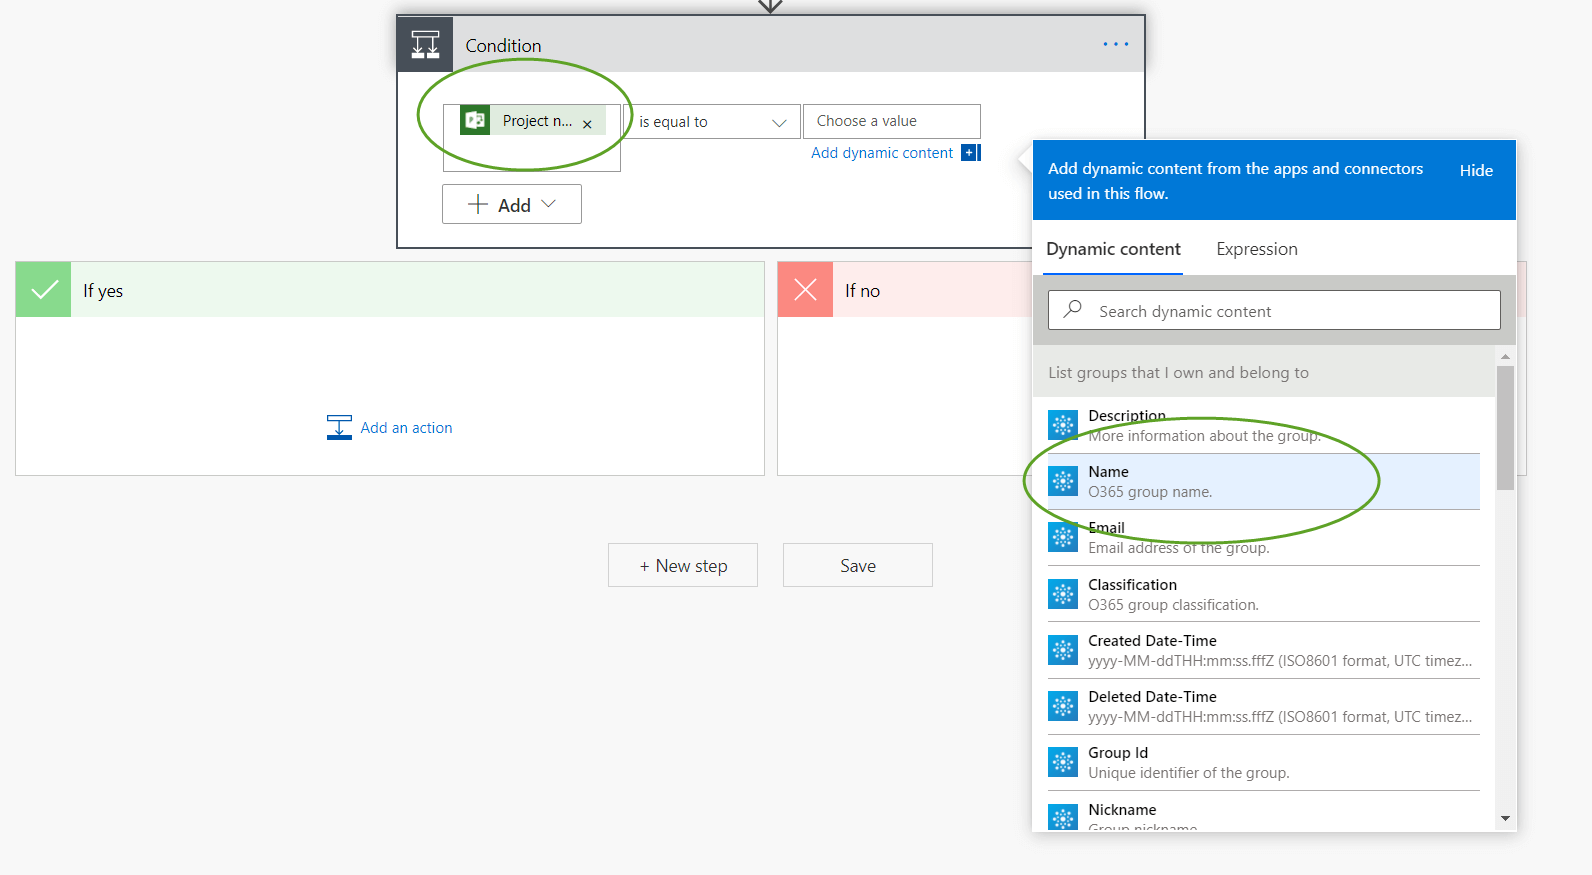
- For the Choose a value on the right, select Name (O365 group name).
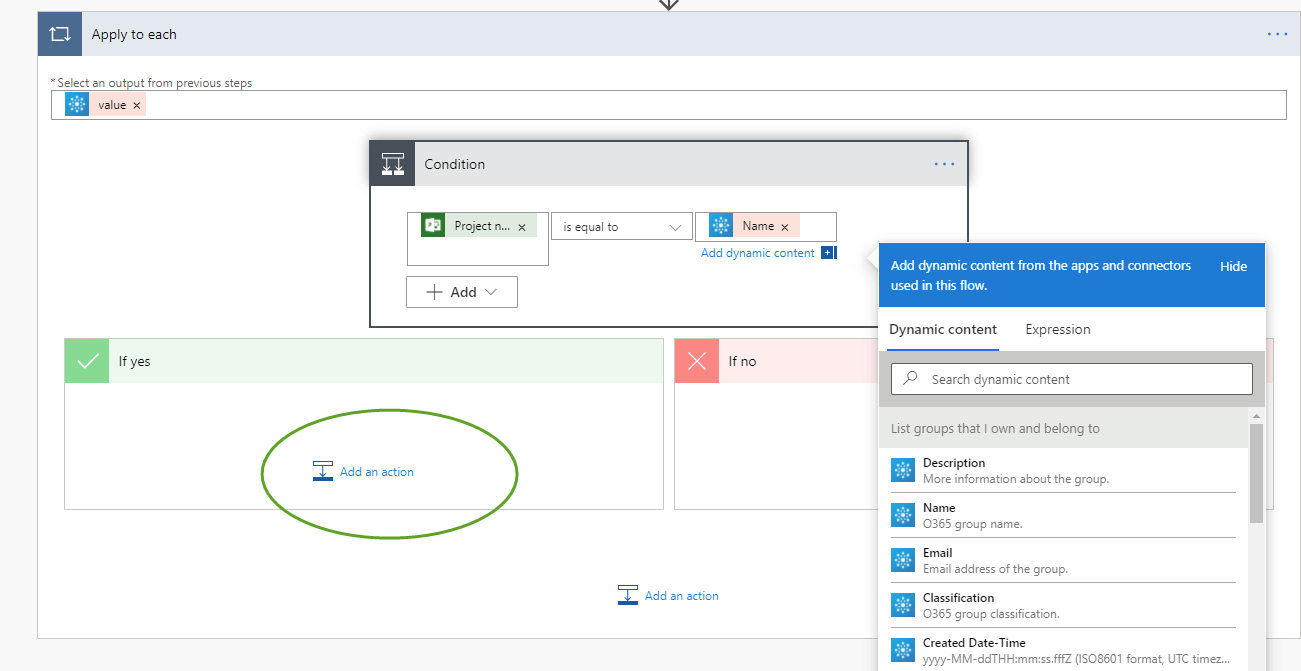
- In the If yes box on the left, click the Add an action link
- Type Planner in the search connectors and actions search box.
- Locate List plans for group under the available Actions and select it

- For Group Id, click the drop down list box and scroll to the end to select Enter custom value
– Locate and select Group Id in the Dynamic content tab under the List groups that I own and belong to section.
– Click the Add an action link under the List plans for group action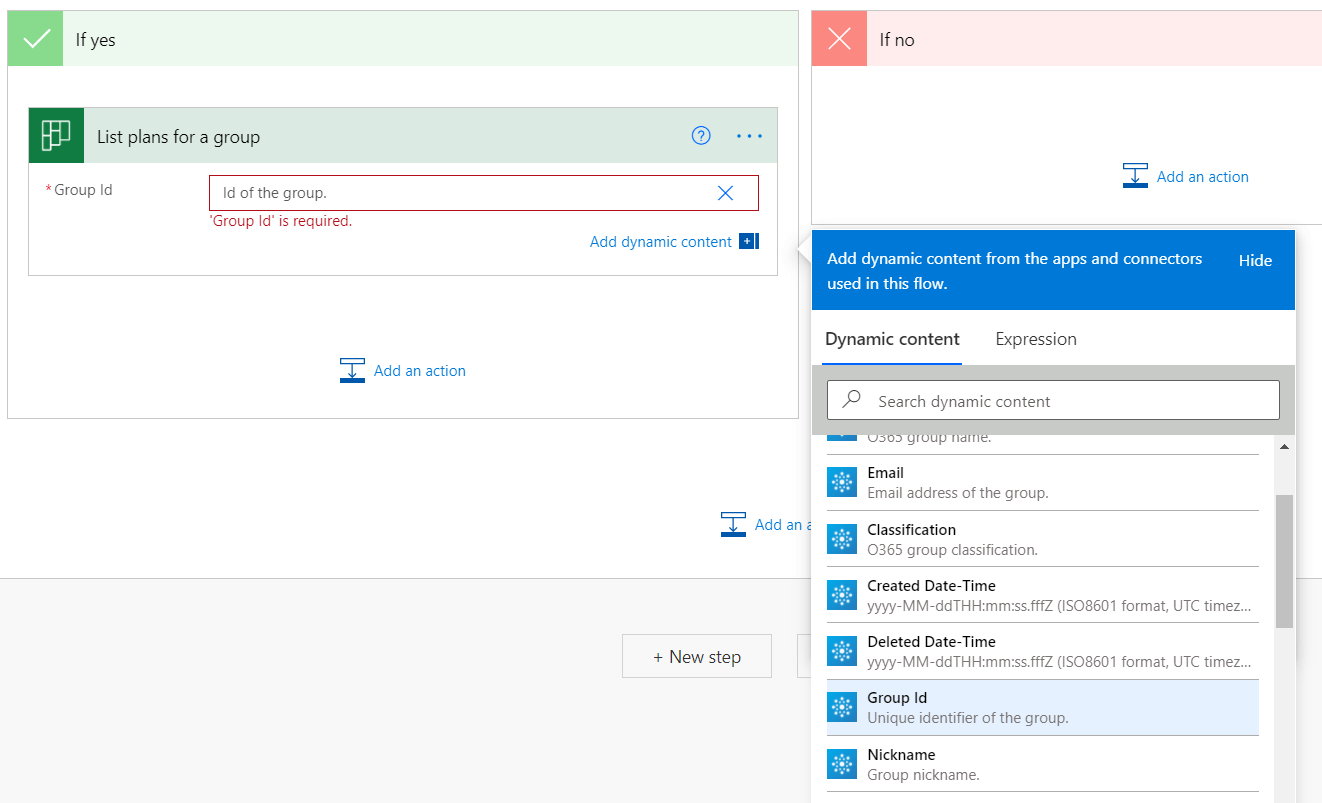
- Locate Condition under the available Actions and select it.
– Locate Condition under the available Actions and select it.
– In Choose a value on the left, locate and select value Title in the List plans for a group section of the Dynamic content.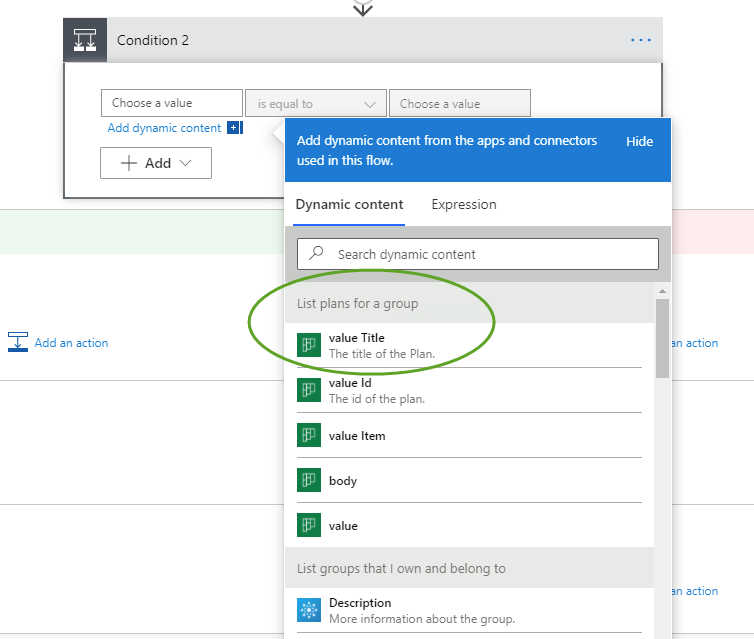
- If the condition block closes, click on it again to open it
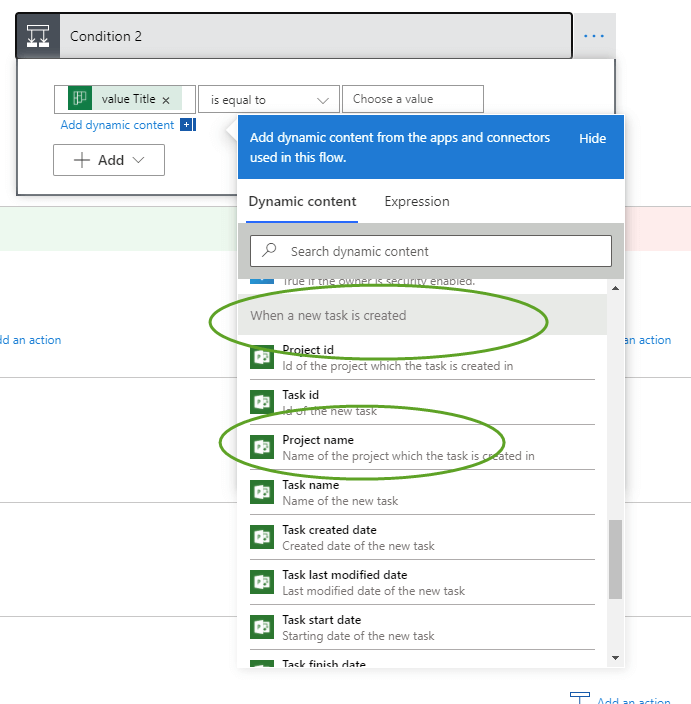
– In the Choose a value on the right, locate Project name in the When a new task is created section and select it.
- In the If yes block under the condition just created, click the Add an action link
- Type "Planner" in the search connectors and actions search box.
- Locate the Create a task action and select it from the retrieved actions.

- For Group Id, click the drop down list box and scroll to the end to select Enter custom value
- From the Dynamic content list, under the List groups that I own and belong to section, locate and select Group Id
- For Plan Id, click the drop down list box and select Enter custom value
- In the Dynamic content section, select value Id in the List plans for a group section
- For Title, select Project name in the When a new task is created section.
- In Start Date Time, select the Expression link and paste in the code below
formatDateTime(triggerBody()?['TaskStartDate'],'yyyy-MM-ddTHH:mm:ssZ')
- in the Due Date Time , select the Expression link and paste in the code below
formatDateTime(triggerBody()?['TaskFinishDate'],'yyyy-MM-ddTHH:mm:ssZ')

- Click the save link in the top-right to save your flow
- If you have any errors check and correct your flow
- When clear of errors click the Test link in the upper right.
- Select the radio button for Manually, then click the Save & Test button
- Now add a task to a project in Project Online and publish it.
- After a few minutes your flow should run successfully and create the new task on a corresponding project in Planner.
- Note, you will need a project in planner with the same name in order for the flow to function properly
Share This Content!
Title
How To Create A New Task In Planner
Source: https://integent.com/how-to-use-power-automate-to-create-tasks-in-planner-from-new-tasks-created-in-project-online/
Posted by: cumminstric1997.blogspot.com
0 Response to "How To Create A New Task In Planner"
Post a Comment